I've written a new maxscript to disable the default viewport feature which shows Edged Faces on any selected object. As far as I know, this feature was NOT enabled in previous versions of Max but suddenly seems enabled by default in 2015. Maybe I've done something without realizing it, but I don't like this feature enabled for each viewport by default. I love Edged Face mode, but I want control over when I use it.
I've written a new Maxscript to "Disable" this feature on a Max "Start", "Reset", or File "Open" command. You can still enable this feature during your work session on a viewport by viewport basis (as it is implemented) even if you run this script.
Go to http:\\www.digitalanimation.net for the download

Monday, November 17, 2014
Forest Pack "Hidden" Render Nodes
Rendering With Forest Pack???
Have you noticed that sometimes itoo's Forest Pack wants to create some "nodes" just before rendering? Not sure what causes this, but I've seen it now in a Max 2015 scene with a large Forest using Mental Ray Proxies. Max throws a warning upon rendering if the current ACTIVE LAYER is hidden. Make sure your current active layer is NOT HIDDEN and can be written to for these temporary Forest Pack nodes before submitting for render. These Forest Pack nodes are deleted as soon as the render is finished, however, they can create an extra layer too that is suddenly empty when the render is finished. Not sure what specific scene/forest pack/max settings are creating this odd occurrence or if this is something endemic to Forest Pack now. Anyway, it seems like a strange thing I came across and wanted to pass on. Happy Rendering!
Sunday, October 19, 2014
Displacement and Falloff
If you've used the Displacement option on a material with the Mental Ray renderer then you've probably been frustrated when trying to use it within an animation. You can use the "View" option which will limit the effect to your current camera (or perspective view) and this works fine for still images. Over the last few years I have on occasion wanted to use Displacement to help create grass in an animation. Of course the "View" option will create all kinds of artifacts and flickering under this scenario, regardless of your render settings, as MR re-computes the Displacement effect each frame and it ends up just slightly different each frame. I have not had luck unchecking Displacement, being willing to eat the render overhead as the effect is computed for the entire scene.
You might think to try using a "Falloff Map" map to control the effect over distance as I did. However, for whatever reason, Mental Ray will not respect this and it still computes the effect over the entire surface. I've even tried using a black and white "Mask" Map to control the physical location of the effect on the surface and this fails also. Below is a sample rendering with this technique. In this case the Black diffuse colored grass is in the foreground and shows what should be the limit of the displacement effect, yet the effect continues on to the horizon as shown with the green colored grass.
I would have to assume that the "View" option in the renderer precludes the use of any other technique that might do the same thing.

I have yet to find an acceptable solution and it's sad because this technique can be used to quickly add detail where needed, but apparently only in still images. If you come across this post and have a solution, please let me know.
You might think to try using a "Falloff Map" map to control the effect over distance as I did. However, for whatever reason, Mental Ray will not respect this and it still computes the effect over the entire surface. I've even tried using a black and white "Mask" Map to control the physical location of the effect on the surface and this fails also. Below is a sample rendering with this technique. In this case the Black diffuse colored grass is in the foreground and shows what should be the limit of the displacement effect, yet the effect continues on to the horizon as shown with the green colored grass.
I would have to assume that the "View" option in the renderer precludes the use of any other technique that might do the same thing.
Wednesday, September 24, 2014
DAS Tree Creator Maxscript
Progress continues on the DAS Tree Creator Maxscript for creating fully 3-dimensional trees using opacity/cutout mapped "Branchlets" or "Fronds" for the primary leaf regions. The script is very robust yet easy to use, giving the artist control over the structure of the tree, the level of detail and mapping, plus the ability to edit the tree as a mesh object. Below is a capture of the current UI from the script:

The script is intended to make good looking trees for real-time applications, not to try and replace existing programs like Onyx Tree Storm, Laubwerk, or X-Frog trees which make photo-realistic trees for pre-rendered applications. Trees generated from the script can look very good with as few as 1500 poly's but the user can control the level of detail and create better looking trees at the expense of poly counts.The user has control over the shape, size and detail of the trunk as well as the number, shape, size and detail of branches. Using your own created "Branchlets" (several examples will be included with the script) you can customize the canopy shape and density. The script has the ability to make conifers as well as deciduous trees and even bushes. Below is a screen capture of a test making a Birch tree. The total number of polys is less than 1700 (the viewport stats include a few hidden entities).

Though most rendering engines have gone away from opacity mapped trees, it is still needed in the real-time applications where millions of polys for foliage is unacceptable.
A release date is not set but it is my intention to make this a commercial script.
The script is intended to make good looking trees for real-time applications, not to try and replace existing programs like Onyx Tree Storm, Laubwerk, or X-Frog trees which make photo-realistic trees for pre-rendered applications. Trees generated from the script can look very good with as few as 1500 poly's but the user can control the level of detail and create better looking trees at the expense of poly counts.The user has control over the shape, size and detail of the trunk as well as the number, shape, size and detail of branches. Using your own created "Branchlets" (several examples will be included with the script) you can customize the canopy shape and density. The script has the ability to make conifers as well as deciduous trees and even bushes. Below is a screen capture of a test making a Birch tree. The total number of polys is less than 1700 (the viewport stats include a few hidden entities).
Though most rendering engines have gone away from opacity mapped trees, it is still needed in the real-time applications where millions of polys for foliage is unacceptable.
A release date is not set but it is my intention to make this a commercial script.
FBX exporter Maxscript for UE4 by Tom Shannon
Tom Shannon http://www.tomshannon3d.com/ has written a Maxscript to assist with the tedious process of exporting scene objects to FBX for use in Unreal Engine 4. I came across Tom's script while doing some research online, but haven't had a chance to try it out yet.You can find info and a download link here:
http://www.tomshannon3d.com/2014/07/tstools-first-release-ue4-mass-fbx.html
There are several youtube video links posted as well.
Thanks Tom!
http://www.tomshannon3d.com/2014/07/tstools-first-release-ue4-mass-fbx.html
There are several youtube video links posted as well.
Thanks Tom!
UVW Unwrap for Unreal Engine 4
Users of Epic's Unreal Engine 4 will know that you need a UVW layout with no overlapping faces for static mesh shadow computations. By default this is UVW channel 2 but you can change it to whatever channel you want inside UE4, especially if you have some complex mapping using several channels already. It couldn't be easier to setup in Max. First, just apply a new UVW Unwrap Modifier to your object and change the Map Channel to the last unused number. Then open the UVW Editor and under the "Mapping" menu item choose "Flatten Mapping..." Typically you can accept the default settings and your done! Below is the result with a Standard Max Teapot Primitive:

If you're not happy with the results you can try "Unfold Mapping..." and/or the "Pack UV's.." option from the "Tools" menu. The integrity of the layout doesn't really matter since it's just being used for shadow casting. It's not really important that these UV's be packed efficiently. The only critical issue is that none of the UV's can overlap or the shadow casting algorithm will fail, you'll get a warning from Unreal and there will be no shadows computed for that mesh.
If you're not happy with the results you can try "Unfold Mapping..." and/or the "Pack UV's.." option from the "Tools" menu. The integrity of the layout doesn't really matter since it's just being used for shadow casting. It's not really important that these UV's be packed efficiently. The only critical issue is that none of the UV's can overlap or the shadow casting algorithm will fail, you'll get a warning from Unreal and there will be no shadows computed for that mesh.
Monday, May 19, 2014
beware "Plugin.UserSettings.ini
Years ago, Max had a single "plugin.ini" in the root directory of the software. Adding a custom path in this ini would allow you to put plugins in a central location on your network rather than inside each installation itself. Now this "plugin.ini" is placed in each user's installation directory:
"C:\Users\*user*\AppData\Local\Autodesk\3dsMaxDesign\20XX - 64bit\ENU" and called "Plugin.UserSettings.ini
If you try creating a custom "plugin.ini" and placing it in the install directory like the good ol days, Max will ignore it.
If you want to set custom paths to plugin locations, it is done by editing this file, but beware, the first time you render with max under that user, max will re-write this file to it's default. Once this initial rendering, right after install, is done, then you can configure this ini as desired.
 As for network rendering, make sure you know under which user's configuration the software is choosing to get it's settings from. Typically the user who installed it originally.
"C:\Users\*user*\AppData\Local\Autodesk\3dsMaxDesign\20XX - 64bit\ENU" and called "Plugin.UserSettings.ini
If you try creating a custom "plugin.ini" and placing it in the install directory like the good ol days, Max will ignore it.
If you want to set custom paths to plugin locations, it is done by editing this file, but beware, the first time you render with max under that user, max will re-write this file to it's default. Once this initial rendering, right after install, is done, then you can configure this ini as desired.
As for network rendering, make sure you know under which user's configuration the software is choosing to get it's settings from. Typically the user who installed it originally.How to fix missing plugcfg "ini" files
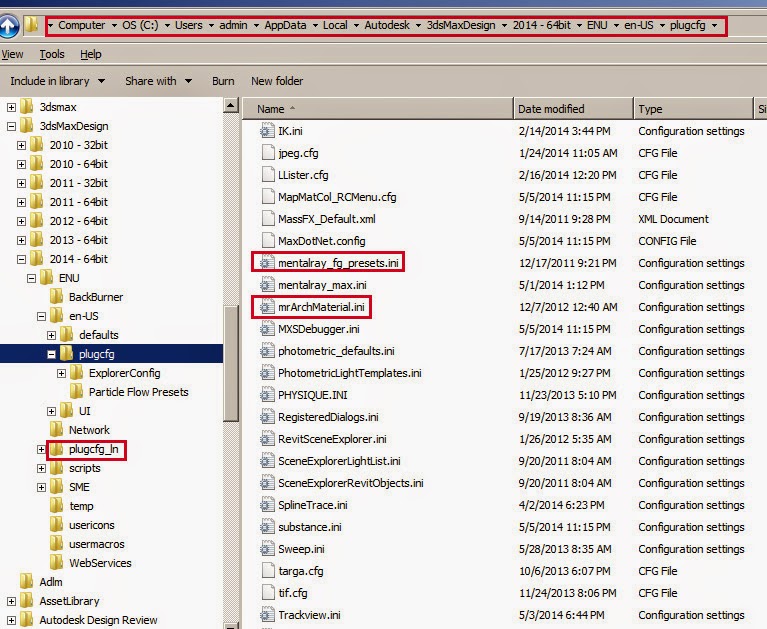
This has been an issue noted over the years and asked about a lot on the forums. A common problem users run into after installing the software is missing ini files, specifically for Mental Ray Global Illumination "Presets" in the Render Dialog as well as Arch & Design Material "Presets" (located in the drop-down at the top of the A&D Material's Dialog). These are stored in .ini files located in the plugcfg directories. However, since Autodesk went to a system of installation that can be customized for individual users on the same machine, some users find that these presets are missing for them. These files can be found on the computer and copied to another plugcfg folder (there are actually several since max 2013). See the image below to see the .ini files, located in the language-based sub-directories of the particular user's Max installation (in this case "en-US") where they can be copied and then pasted into the alternative "plugcfg _ln" folder highlighted below. Once pasted into this folder they will now show up for that particular user when he/she starts max. I usually copy all the .ini files and paste them in, ignoring any duplicates upon paste.
I don't find this issue when a single user installs the software and then uses it, but when multiple users are using Max on the same computer under their own different logins.
The above directories are located in the user's software installation:
"C:\Users\*user*\AppData\Local\Autodesk\3dsMaxDesign\20XX - 64bit\ENU"
Copy the .ini files from:
"C:\Users\*user*\AppData\Local\Autodesk\3dsMaxDesign\20XX - 64bit\ENU\en-US\plugcfg"
to
"C:\Users\*user*\AppData\Local\Autodesk\3dsMaxDesign\20XX - 64bit\ENU\plugcfg_ln"
Another solution I have not tried is copying these .ini files into the actual Max "Program Files" installation sub-directory also labeled "plugcfg_ln". This might be a global solution for all users.
Sunday, May 18, 2014
3ds max 2015 Local Maxscript Help File
If you're looking for a downloadable copy of the MaxScript Help for 2015 it can be found here:
3ds max 2015 Help
One of the new features of the 2015 online help is that all the help files are combined into one so if you search for something that you want to know more about for scripting purposes, you often get just the max general help for that topic. As if it wasn't hard enough in the old, separate MaxScript help to find the specific topic you wanted. It's especially difficult if you don't know the exact scripting phrase you're looking for (that's usually me).
Once you unzip the link from above, if you chose the .chm version (I still like that) you may find it doesn't display. Here are the instructions from the .zip to get Windows to "unblock" the file:
If your .CHM file does not load any help pages into the main content
panel, you may need to unblock it.
To unblock your .CHM file:
1. Find the file in Windows Explorer.
2. Right-click the file and select "Properties" from the contextual
menu.
3. On the General tab, click the "Unblock" button.
4. Re-open the file.
If the "Unblock" button does not appear, or if the file still does not
show any content:
- Ensure that there are no special characters anywhere in the path
and file name of the .CHM file. The # and . characters are known
to prevent CHM files from displaying correctly
- Ensure that you are not trying to open the file from a network
location or shared folder. Move it to a location on your computer.
Happy Scripting
Friday, May 16, 2014
Rendering with IBL
Just a quick note that since 3ds max 2014, IBL is checked as the default for "Skylight Illumination" in the "Global Illumination" rollout of the Render Dialog for Mental Ray. If you are NOT using IBL (for example, you are using a standard "Daylight System") your render times will nearly double trying to render with the IBL radio button chosen instead of "Final Gather". Make sure you have the right option chosen for your lighting scenario.

Wednesday, May 7, 2014
3ds Max Service Pack 5 Bug
I noticed the report of a critical bug in the service pack 5 release for max 2014 at one of the Autodesk Blogs (can't remember which one at the moment). It regards Backburner (of course) and some confusion between render nodes, the backburner manager and the submitting workstation. Apparently the update fails to install the correct Environment Variable (System) so that the computers understand whether you are rendering with 3ds Max or 3ds Max Design. The solution was posted here:
Backburner Environment variable fix
Backburner 2015 can be downloaded from the Autodesk Exchange here:
backburner 2015
Backburner Environment variable fix
Backburner 2015 can be downloaded from the Autodesk Exchange here:
backburner 2015
3ds Max 2015 Updates and Downloads
3ds Max 2015 updates and downloads can be found here:
3ds max downloads page
This includes Service Pack 1 (already) and sample files as well as the latest updates for Max 2014 (SP5)
If you have 2015 installed, you have probably already gotten the notification of the SP1 update from the Autodesk Application Manager (running in the system tray by default).
New DAS Maxscripts Available!
There are several new maxscripts at the DAS web site. Check 'em out!. These include a new version of the "Time Bandit" script for quick and precise control of the max Time Slider. This new version allows you to save preset time ranges and recall them at any time later. They are saved with the max scene. A great feature suggested by my colleague Jason Brummett.

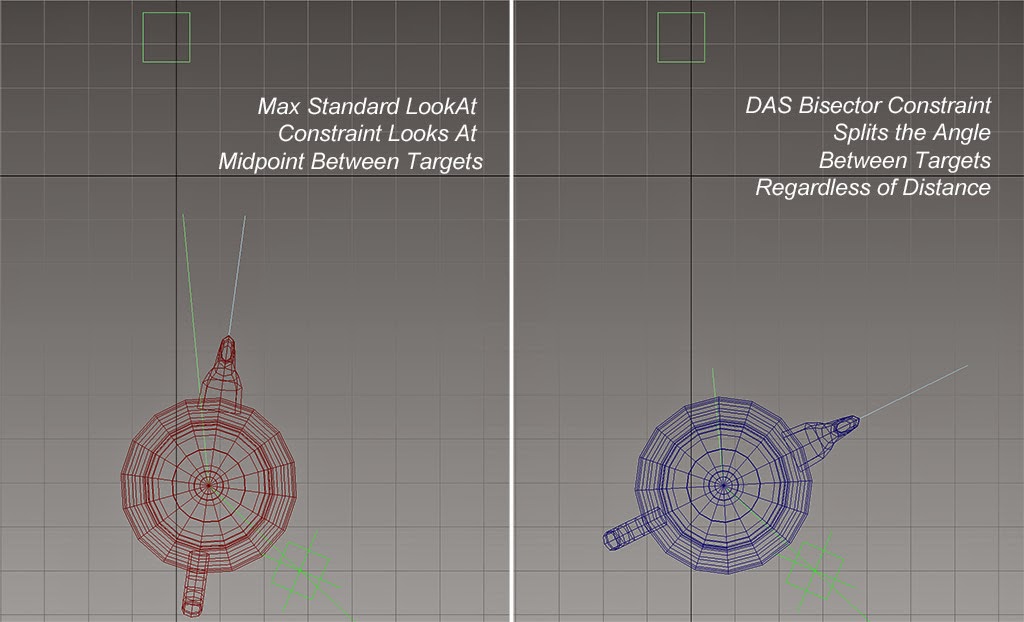
Also you'll find a unique MaxScript called "Bisector" written as a request from Derek Townshend, a Max user on scriptspot. Bisector is a custom, scripted controller embedded in the Max LookAt Constraint that forces a source object to always split the angle between 2 look at targets. The default LookAt Constraint actually doesn't do this, but rather forces the source node to look at the "midpoint" between the 2 targets. As Derek pointed out to me, that midpoint changes when the 2 targets are different distances from the source. Take a look at the sample below to see the difference:
An interesting MaxScript challenge and functionality that should really be part of the LookAt Constraint to begin with.
MotionBuilder 2015 & Kinect
I noticed that one of the important updates to MotionBuilder 2015 is support for Microsoft Kinect data import onto Actors. Being involved with motion capture, this will be something to look into in more detail.
Wednesday, April 9, 2014
3ds max 2015 Help Files available online
The Autodesk 3ds Max 2015 Help files are available online now at:
http://help.autodesk.com/view/3DSMAX/2015/ENU/
Thanks to Mark Kauffman for posting the link at the Autodesk Entertainment User Group of Denver linked in page.
http://help.autodesk.com/view/3DSMAX/2015/ENU/
Thanks to Mark Kauffman for posting the link at the Autodesk Entertainment User Group of Denver linked in page.
Sunday, February 23, 2014
Dynamic Reflections with Nitrous
The ability to see dynamic, real-time reflections in the viewport has been in Nitrous for a while but not exposed to the user interface. A simple maxscript can enable this feature. I have uploaded a pair of macros to enable or disable it You'll find them on the "Maxscripts" page of the DAS web site. Just copy the 2 macros to your Macroscripts folder (wherever that may be), restart Max and follow the instructions for activating and using the macros as described in the screen capture images in the zip download. A sample of the dynamic reflections in use is included and shown below. This is just a quick feature enhancement to the viewports. More powerful scripts are out there to help wrangle Nitrous to your liking.

Sunday, February 2, 2014
Backburner running as service
If you're using Autodesk Backburner to control your network rendering and you have backburner set up to run as a service across your network, you've probably noted in Windows 7 that if you're using a local domain for your network, you need to use a login account for the service that has top level domain privileges. Otherwise, the service will have trouble talking to the manager.
What you may not have known is exactly which account 3ds max is using when it starts as a render service. You might have thought it was the login credentials you used to authorize the service or perhaps even the current user, but you'd be wrong. Backburner is using the account of the user who installed the software. Now if you have a well organized studio or even a small one of your own in which all this has been taken care of by a single individual, this probably hasn't been a problem. But when backburner rears its head and the log starts telling you about missing configurations this is a real difficult problem to nail down, especially with plugins, startup variables or map paths to network locations.
Happy Rendering! (OK, with backburner that's probably a lot to wish for...)
Subscribe to:
Posts (Atom)