Wednesday, November 11, 2015

Poor Normal Map Sampling with Render to Texture

If you've used Render to Texture (RTT) with Mental Ray as your renderer, you may have been frustrated by the poor anti-aliasing quality of Normal Maps produced through RTT. Below are some samples and a description of the problems and my recommended solution at the bottom. If there's a solution I'm not aware of using Mental Ray, please let me know what I'm missing.

I'll assume at this point you are familiar with RTT and have at least dabbled in it to produce various image outputs for use, most likely , in some sort of real-time or gaming environment. I do not profess to be an expert in any of these areas, just another experienced user, frustrated by some unexpected behavior in Max.

1st you likely have a high detail model and you plan to use RTT to render out some good maps to use on a lower detail model. Pretty typical. You probably want to create a normal map to add detail from the high poly version onto the lower poly version. Projection mapping is required and RTT is set up to deal with this.
So next you would align your 2 models, create the Projection Modifier (either by adding it in RTT or manually) and refine the projection cage to your liking. BTW there are tons of great tutorials and forum posts related to these tasks online. However, I have only found a few dealing with the anti-aliasing issue and none addressing the specific issues with Mental Ray (that doesn't mean there isn't something out there of course).

For my examples below I'm using a hubcap model. I've setup the low detail model and Projection Modifier. now let's look at some of the renders RTT produced and some of the settings that are confusing.
Assuming we leave Mental Ray at some generic settings, we have Final Gather enabled, some generic lights and we're using Unified Sampling for anti-aliasing.
Setting up all our settings correctly and doing a render from RTT at 512 x 512 we get a reasonable looking complete map, but the Normal Map seems very pixelated:

Note: Click the images to see the full resolution details


Complete Map with generic settings


Normal Map output by RTT from same render as above Complete Map

 Note the pixelation of the normal map that doesn't seem to be an issue on the Complete Map.

Now to try and fix this within  RTT, we look at the "Options" dialog under the "Objects to Bake" rollout, projection mapping group:
Notice the sampling "setup" which just takes you to the render dialog's sampling group for Mental Ray. At the Unified default of minimum = 1 and maximum = 128 it appears that RTT is only using the minimum for the Normal Map portion of the render and NOT taking advantage of the adaptive sampling up to 128 that we see in the complete map. So to test that, lets set both Max and Min to 1 and see what we get:
Complete Map rendered with Unified Sampling set to Minimum=1 and Maximum=1
Indeed, it looks like RTT is only using the "minimum" sampling setting to render Normal Maps. Ok, so let's set the minimum up to 16 and see what we get.
Normal Map with UnifiedSampling Minimum set to 16
The quality of the anti-aliasing seems no different and in fact if we look at the "Projection Mapping" "Options" we see that the "Samples per Pixel" still says "1". In fact, with Unified Sampling, it will always say 1 and will never render to a higher sampling, leaving your Normal Maps with this poor aliasing.

So what if we change to the old "Classic/Raytraced" sampling method. Now if we change the Minimum, the RTT "Samples per Pixel" option updates. Yippie! Problem solved right? Test our theory by rendering with a minimum of 64 samples per pixel, pretty high quality that should yield nice anti-aliasing:


Normal Map with Classic/Raytraced sampling and minimum set to 64 samples

Well...that doesn't seem any better. In fact, you can set the minimum to something outrageous like 256 and the quality will not improve:
Normal Map with Classic/Raytraced sampling and minimum set to 256 samples
Not only does rendering with 256 samples as a MINIMUM not improve the anti-aliasing, it also takes 7 minutes now.

So, in conclusion, it seems that Render To Texture will only sample Normal Maps at 1 sample per pixel when rendering with Mental Ray leaving you with poorly anti-aliased images.
Solution: render at a higher resolution (2048 or 4096) and downsize the image as needed in Photoshop. The added render time is minimal considering that Normal Maps do not require Final Gather or Shadows so you can turn them off before rendering. And you can set the Sampling quality to minimum=1 and maximum=1:

Normal Map rendered at 2048 x 2048 downsized to 512 x 512. Sampling =1 with no Shadows or Final Gather
On a final note, for down-resing your image in Photoshop, you might want to pick the Bicubic "Smoother" option rather than "Sharper" filtering option to avoid some artifacts. This is contrary to the common practice for re-sizing images in Photoshop.


Wednesday, October 7, 2015

Distributed Bucket Rendering, Socket error when connecting to slaves

If you've tried to do a Distributed Bucket Render with Mental Ray and run into the dreaded socket error where the host cannot talk to the slave nodes, assuming you've set up your "max.rayhosts" file correctly, the error could be due to the fact that the Mental Ray Satellite service is not running. This will generate the socket connection error which at first, makes you think you have a network problem. Note that prior to release 2015, when you installed 3ds Max, this service was set to be started automatically and always ran in the background, ready to be used when you submitted a DBR. However, since release 2015, the service is installed but set to "Manual" startup type so you must access your system services and turn it on before rendering.

Monday, October 5, 2015

New Tutorial for Max 2016 Extension 1 "TextPlus" object

I've uploaded a new tutorial on using expressions to control the "Value as Text" option in the TextPlus Primitive, new to Max 2016 with Extension 1. You can find it on YouTube at:
This is a welcome new feature and I can think of a lot of uses for it just for working within your scene.

Tuesday, July 7, 2015

Force Local Render in 3ds Max 2016 from Older File Set to Network Render

The new Render Settings Dialog in Max 2016 places the core render engine settings at the top of the floater window. A nice change, but the new, large "Render" button no longer has a small drop down arrow with it where you choose to network render or local "Production" render.


This is OK unless you have opened a 3ds max scene file from several versions earlier where the default "Network Render" option had been chosen. Apparently this setting was embedded in the scene when you saved it (obviously as a Render Dialog setting) and is now read by Max 2016 as the mode of render when you press the new big "Render Button". In other words, though the "Target" setting is set to "Production Render Mode", max still submits your render to the network as if the "Target" option was "Submit to Network Rendering...". Assuming you do not want to network render, there is currently no way to "reset" this flag back to a local render. The work around is to change the render "Target" to some other option and then back to "Production Rendering Mode". This forces the embedded render profile to be reset.

Tuesday, March 24, 2015

Chi-Chi the Chinchilla and the Three Worlds

A quick marketing announcement, not usually the kind of thing I would post here, but I've been asked about this over the last year from several colleagues.
Katia Gaidouk, the author of "The Adventures of Chi Chi the Chinchilla", has started a Kickstarter Campaign to fund the 2nd book in her series. Book 2 is entitled: "The Adventures of Chi Chi the Chinchilla and the Three Worlds".


We have been in touch to produce a new, short video based on this book. Having read the draft last year, I'm excited about all the new characters and the potential of a lot of challenging animation from her new story. You can read more about the kickstarter campaign and even contemplate a donation (much of her proceeds go to the non-profit "Child Fund") here: Chi Chi on Kickstarter

Monday, March 16, 2015

Unreal Engine Launcher Self Update

It's possible to stop the Unreal Engine Launcher from doing its automatic update whenever you start it. It's not really a software setting or configuration as you might expect but according to Epic, it's merely a matter of adding a flag to the launcher executable shortcut (typically on your desktop). If you R-Click the shortcut and choose "Properties" from the menu, then choose the "Shortcut" tab you'll see the "Target" path location. Simply add:
 "-noselfupdate" (without quotes)
at the end of the path, after the quotation mark.

So it would read something like this in the "Target" field:
"C:\Program Files\Epic Games\Launcher\Engine\Binaries\Win64\EpicGamesLauncher.exe" -noselfupdate

Of course, to ever get any of the updates, and they are frequent as you know, you will have to remove the added flag before starting the launcher.

Friday, March 13, 2015

Bake "Populate" Characters to Mesh and Bones With Skin

I first heard about this feature during a 3ds max demo last year by Gary Davis, 3ds max guru and Autodesk M&E Senior Technical Specialist. It is possible to "Bake" the "Populate" character crowd simulation in Max to simple meshes with bone systems (not Character Studio) and Skin Modifiers.
After creating your "Populate" crowd simulation use the "Simulate" feature to create the animation. Then simply select the characters in the crowd that you want to bake and enter "pop.bakeselpeople()" (without quotes) into the MaxScript Listener. All the characters will now be individual meshes with bones system animations and a Skin Modifier. Of course these can now be exported as FBX and then imported into any other software or game engine that supports fbx.


HOWEVER, be aware of several caveats:
1. You will lose ALL Materials assigned to these characters unless you have them available in the Materials editor BEFORE you bake. So make sure and save a library or at least populate (no, NOT THAT "Populate") some material slots or the Slate Editor with all the materials for your selected characters so they can be re-assigned after baking.
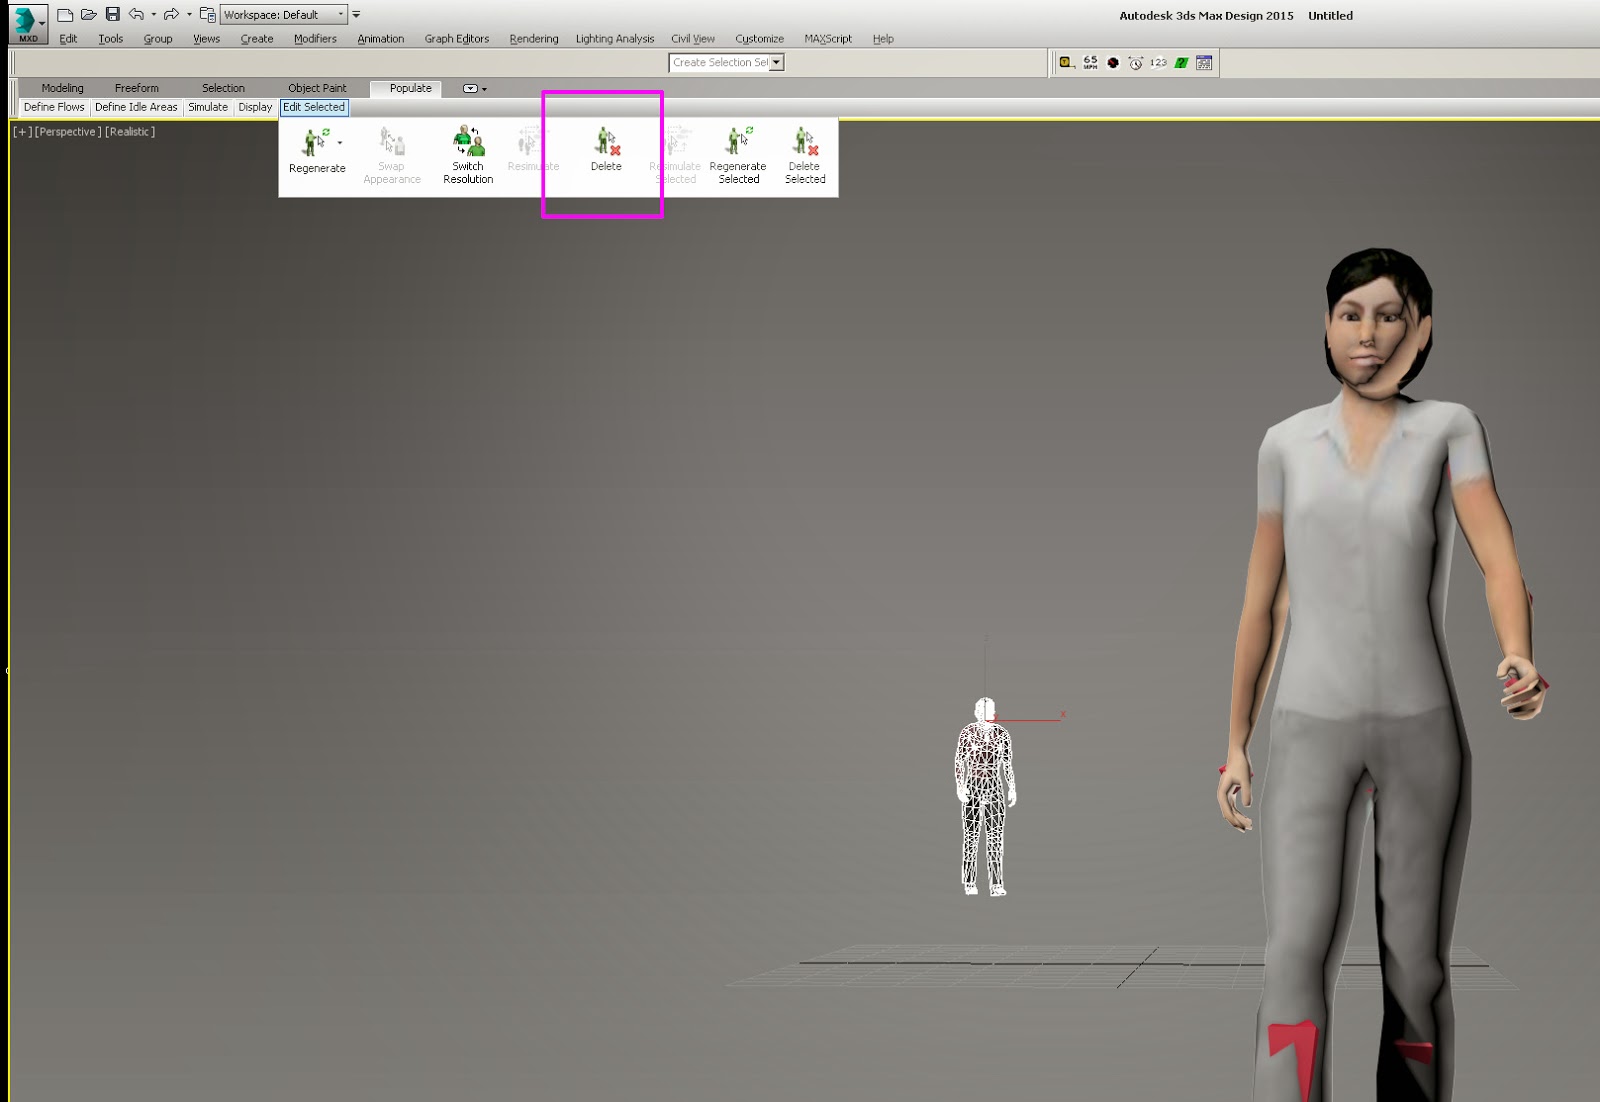
2. There can be some residual "Characters" left over in the scene. These "characters" are figures that were waiting to enter the simulation at the appropriate time but were not actually showing during the full length of the simulation time range. They will have a Visibility animation track and you will have to scrub the timeline to see them if they are there. If you select one of these "characters" they will show as "Populate Skin" in the Modifier Panel and you cannot Delete them except through the use of the Populate toolbar (see below)

A baked "Populate" character (foreground with bones showing through the skinned mesh)and residual "Populate Skin" figure (male in the background)
that does not show up until late in the animation.


Use the "Delete" option in the Populate toolbar
to remove the residual character after baking with MaxScript

Of course the higher resolution character library is available for download (about 600 MB). If not installed and you try to switch to it on the toolbar, you'll be taken to the web site to download it.


Thursday, March 12, 2015

Unreal Engine 4.7 New "Two-Sided Foliage" Shader

Along with some other great updates, UE 4.7 now has a  "Two-Sided Foliage" shader. This is a great enhancement to the traditional Two-Sided option for "Default Lit" shaded materials. This shader enables sub-surface coloring on the back sides of thin planar geometry such as leaf planes and grasses adding much more realism. Below are 2 examples of the effect. The first is a screen capture of a mid-poly tree using "Branchlets" (as I call them) or "Fronds" (as with SpeedTree) made up of planar mapped branches, twigs and leaves on a single surface rendered in UE 4.4 without the Foliage shader option. A little "Emissive" self illumination has been added to help show both sides of the surfaces. Not an ideal solution but you get the idea. Also, this first render did NOT use a skylight. Just an omission on my part, not to demonstrate any particular effect.
A standard "Default Lit" 2-sided shader in UE 4.4

This 2nd image is the same tree using the new Foliage shader with the Sub-Surface effect. Notice how nicely lit the backs of the leaves are. This scene does also contain a skylight so there is a little indirect illumination as well, but it is not responsible for the sub-surface effect.
"Two-Sided Foliage" shader from UE 4.7

Here's a screen shot of the material setup. The Diffuse texture is also used to dictate the sub-surface illumination. Wiring it through a multiply parameter allows for some fine tuning. Epic recommends that you use perhaps a separate texture for this that has more contrast to dictate how the sub-surface effect varies within the texture map (twigs, veins, etc.). Cranking up the Multiply effect on the Sub-Surface Color can eventually wash out the effect much above 3 or 4. The Multiply parameter is not required on the Diffuse property itself but I like the added control to adjust the look.
A material using the new "Two-Sided Foliage" shader in UE 4.7

Below are also 2 screen shots "in game" of the tree in UE 4.4 and then in 4.7 Again, there was no skylight used in the UE 4.4 sample and perhaps a little too much "Emissive Color". In addition, a simplified Normal map was used, just the diffuse shader run through the nVidia filter in Photoshop. In the 4.7 sample a proper Normal map was used to specify and enhance the random orientation of the leaf normals, producing a far superior looking tree without any additional enhancement.

Tree in Unreal Engine 4.4 with standard "Default Lit" shader

Tree in Unreal Engine 4.7 using "Two-Sided Foliage" shader 
with enhanced Normal map and Skylight for indirect illumination.


Displacement Changes Do Not Update - Quick Tip

Have you ever been tweaking your Displacement render settings in max but don't see the results updating in your renders?

A quick tip when this happens is to make sure you have "Geometry Caching" disabled in the "Processing" tab of the mental ray renderer.


I've made this mistake several times and only seem to remember after several dramatic changes to settings seem to have no effect on my renders.

Monday, March 2, 2015

Unreal Engine is Now Free

Today (3/2/15) Epic Games announced that Unreal Engine is now available for free.
Click here for the official announcement.
The license restrictions still apply but there is no longer a monthly subscription fee, which frankly, was already a pretty good deal. We'll see if Unity follows next. It seems like the 2 companies are caught in an "Epic" battle to win over the gaming community.

Wednesday, January 28, 2015

Will Autodesk kill 3ds max next?

There have been so many extensive forum threads on this topic over the last year since Autodesk did away with SoftImage. A lot of warnings to 3ds Max users to choose another software program fast, abandon Autodesk, fear for your life, start learning Maya, etc. Max was next on the chopping block. The SoftImage users were a dedicated bunch, though statistically shrinking, but imagine how you'd feel if your career software package hit its end-of-life cycle? I thought these insights from the Digital Tutors Blog were very good and the subsequent comments insightful.
Read it here

Tuesday, January 27, 2015

Max 2015 vanishing icons

This bug has been bothering me since day 1, where sometimes the toolbar icons (particularly drop-down lists) or even parts of the UI vanish while working. Research has told me that this is because max 2015 is using hardware acceleration to draw the UI and in complicated scenes or when lots of graphic's intensive resources are being called up, some parts of the UI don't get completely redrawn.
Either way, an interesting workaround was mentioned on one of the forums (sorry, I don't remember the user). Pressing the "M" key to quickly toggle the Materials Editor will force a redraw of the icons and UI. Seems to be working so far. Thanks! (whoever you were).

Nitrous Soft Shadows & Shadow Map Resolution

Call me an idiot if you like, but when trying to achieve soft shadows from a Nitrous display, I just couldn't get it to work. Changing the Shadow Map size on the lights had no effect, nor increasing the Lighting and Shadows Quality slider in the Viewport Configs. Well, a little research and it turns out it's been there for a while if you try taking the Quality slider DOWN to the left. I didn't think to keep setting the quality of my viewport shadows down to lower and lower settings, but 2nd from the left is "Point Lights/Soft-Edged Shadows". Not sure how this affects other parts of the viewport quality but it might be handy on occasion.

You can use this feature along with a MaxScript command (available since 2014) that controls the shadow map resolution used to display shadows in the Nitrous viewports. Shadow Map size for lights ( you must have physical lights in the scene, not the default lights) can be set with a simple MaxScript command referring to the Nitrous Graphics Manager core interface. The default Shadow map size used by Nitrous is 512 but you can raise or lower this to your liking to affect the crispness of the viewport shadows. Use the following MaxScript command, typed into the Listener (w/o quotes of course):  "NitrousGraphicsManager.ShadowmapSizeLimit = 1024"  
(or whatever size you like, but not likely above 4096 which is the typical high end texture size limit for graphics cards). Keep in mind that though maxScript expects this number to be an integer value, it's probably a good idea to keep it power of 2.

Viewport Mouse Focus & Focal Point Sampling

There's been a feature out in max since 2013 called "AutoFocus Viewport" that allows you to maximize a viewport from a multi-view display, based on the current location of your mouse (with the hot key for maximizing a viewport (Alt+W)). In other words, you can maximize a viewport simply based on whether your mouse cursor is currently in that viewport. Previously you had to R-Click to activate a viewport before maximizing. This functionality can be enabled/disabled from the "Mouse" tab of the "Customize UI" options.The "Mouse" tab was implemented in release 2013 and also contains some other features including some old favorites that used to be in the "Viewport" tab of the "Preferences" options.


There have been some additional issues reported by users related to a new 2015 viewport navigation feature (not documented very well IMO) to resolve some older viewport navigation complaints. Any long time user is familiar with max's perspective view problem zooming and panning in large scenes. For example, after a lot of zooming in to an object, the increment of zoom and pan becomes very small and you are forced to zoom extents to re-establish an appropriate increment based on your current view/proximity. "Viewport Focal Point Sampling" was implemented to try and fix this, but apparently didn't work very well. You can follow some of the threads about this here: Focal point Sampling Issues. It is reportedly fixed in Serve Pack 3, though one of the user comments on the SP 3 release states that it is not fixed. SP3 is included in Extension 2 for subscription user and can also be downloaded here available from here: